Introduction.
There are those days where as a Wisconsinite you wake up and just feel amazing. The first thing you hear, birds. The first thing you feel, warm sun coming through a window. An emidiate energy that you feel only a few times during a Midwestern window. This was the first day it really felt nice again. As such, our professor did not hesitate to take the opportunity to take advantage of the conditions to get our class some time observing and partially participating in a flight mission while also getting the chance to test out a new sensor that is still being configured by the department, a new thermal sensor.
In fact, I was lucky enough on this day to experience 2 trips to the field. Both times involving unmanned aerial systems. In all, I learned a lot about how to establish a safe environment for flying a drone. The aspects that you must continually monitor when flying a drone is the drone itself, the people around, and the environment of the flight mission. To ensure that all these conditions are ideal, there is an extensive checklist that the pilot and the co-pilot must conduct before each and every flight.
In the sections that follow, I will discuss the operations conducted and things I learned during this field experience in terms of lab procedures and field methods. All in all, the focal point of this activity was to gain field experience with the Matrix Platform, and all the other electronic components that relate information to and from the device before and during the mission.
Methods
Before any flight operation, even the mission comes only minutes after flying a previous mission, its imperative that the UAV be given a thorough check down. This list can very from only few basic checking points, to a long list of safe guards (recommended). In the case of these flights, the pilot was the classes teaching assistant Mike Bomber and his co-pilot was our Prof. Jo Hupy. Over time and through many flights, these two have developed a checklist that accounts for checking the drone of any hardware issues, making sure all the systems are connected, while also providing a cleared areas for both take off and landing.
Multi-Copter Check List
The Matrix platform that we are used in the field for this this session was the Matrix Platform equipped with a Geo-snap and a Grayscale thermal sensor. The Matrix a quad-copter with its propellers mounted in rectangle relative to one another. As such, the centrifuge mount of the device is long, almost looking like the chasi of a car. To conduct the checklist of this specific platform, a hard cased field laptop was to open up an excel document, which contained the check listed information. The co-pilot went down through the components of the checklist, reading them out loud to the pilot, whom is will eventually be holding the TX controls, but is right now responding to the calls from the copilot and doing the necessary checks.
When flying a UAV, your checklists will differentiate depending on what type of platform you are flying (fixed wing or copter) and also between platform types within their own respective groups (Matrix vs. Phantom). The checklist for multi rotors was broken down as follows:
1. Mission conditions and flight prep
2. power up
3. take off sequencing
4. post landing
Each component its own way is important when trying to conduct both a safe and successful mission, that provides meaningful results while also lowering risk of damages. Lets look at these individual portions of the checklist more closely.
Mission Conditions and flight prep
 |
| figure 1: environment conditions and flight prep |
The first component of the checklist, the conditions and flight prep is done so that any conditions that could be detrimental to a flight mission can hopefully be identified. The focal point of these checks are to find any sore of hardware issues that if left undetected, could cause a huge problem during flight time. As the co-pilot reads down the list, the pilot is checking the part being called to them for any cracks, looseness, or other issues they notice. Another thing that is noted of during this check are the weather and environmental conditions of that area of interest during that time. This is important to note for when you are processing your data and notice any particular issues with data or image quality, for the issues could be related to conditions.
Power up
 |
| figure 2: power up checks |
The power up check occurs after the platform has been checked for damages and the environment scanned and cleared. This check assures that all the devices are in connection with one other while also checking to see that each component is connected on the platform, and that the battery is providing enough voltage to supply the components of the platform with enough power. Another notable thing that is noted here is the GPS signal strength. This row can bee seen highlighted by the green and yellow in blocks in the row titled UAS # of Satellites. Having more satellites tied to your location is best, because it provides more vantage points to your position and increases your positional accuracy.
The penultimate part of the list accounts for sending all the appropriate information to the platform, so that the device has the necessary flight path and altitude for its mission. This process can be skipped, however, if the flight is being conducted manually, and thus you would not need to send any mission to the mission control aboard the platform
The penultimate part of the list accounts for sending all the appropriate information to the platform, so that the device has the necessary flight path and altitude for its mission. This process can be skipped, however, if the flight is being conducted manually, and thus you would not need to send any mission to the mission control aboard the platform
Take off Sequencing
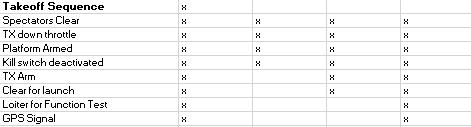 |
| figure 3: Final checks before take off |
Before taking off, the final portion of the checklist, the final components are armed and the controls are engaged. after all necessary connections are made, and the controls are in the hand of the pilot and the right commands are being produced, the fight is almost ready to begin. The last step is once again making sure all spectators are clear to launch. Once the pilot takes the device off the ground by pushing the left stick up, the pilot than turns the device onto loiter mode, where it will hold its position and not move horizontally or laterally. Once here, the pilot than gives the control with another switch to engage mission, and just like that the device takes off and goes to assigned start point and begins its mission.
Post Landing
 |
| figure 4: Post Landing checklist |
Shortly after landing, when the power has been turned down the motors are stalled, the pilot and co-pilot can begin their final check. This must be done even if more flights are still to be conducted later on. This short list covers disconnecting all the components to isolate the device from any remote connections or power sources. Once complete, the pilot checks the sensor to make sure it is still fixed in the position that was desired.
Once disconnected, the rest is up to you. If there are more flights planned, its likely that you have spare batteries ready to replace the ones just used during the flight. If not, your day of collecting UAS data is likely finished. At this point, you should go have nice lunch or drink to conclude a trip to the field where you didn't destroy any of your precious devices, all because your were thurogh in your pre and post flight check, Cheers!!!!
Results
Below is a map showing the subsequent tiffs created from the two areas we flew over during our time in the field on May 7th. The whole collection process took about 2 hours, and both of our flight mission ran smoothly. within this map, you will notice that i focused in on certain areas of both the flight over the garden, and over the pond, to highlight certain aspects of the AOI and how it relates to the data quality provided by the sensor
 |
| figure 5: Maps of AOI and specific issues associated with thermal sensor |
Discussion
Provided that the main purpose of the thermal sensor was to capture the relative heat differences across an AOI, the data didn't prove to be as useful for indexing features as I thought it wold. For example, if you refer to the scaled image at the top right of the document, you will notice that there a car, but that is really it. It is very hard to distinguish that the red objects, directly north of the car, are in fact warm bodied people. I found this concerning, since throughout the pond image we had people scattered about, and they were very much unidentifiable.I was wondering if this is because of inadequacies within the sensor, or is it because it was one of the first warm days of the year, and the ground had been exposed to the sun all day. Just as well, the AOI was covered in newly developed snow-melt puddles, which added alot of contrast to the surrounding ground. As such, the AOI had a lot of varying elements with a wide ranged of temperatures attributed to the certain portions.
For the sensor, I believe that using it only nadir angles was very limiting in terms of detecting humans bodies. This is because from up above, humans would only occupy a seemingly very small amount of space. Perhaps, if taken at oblique angles, their would be more of a subject for the sensor to pick up, because there is more available human body to take heat readings from. If the purpose is detect heat sources, and not produce an accurate orthomosaic, this might be the best approach going forward in terms of increasing the ability to detect humans as the subject of thermal imagery.
The last concern I had was in the DSM of the pond area, and if you refer to the image in the bottom right of figure 5, you can see what i am talking about. The area being focused on is the actual water body of the pond. This could be patches of remaining ice floating above the water which is why the image appears to be oddly ridged at the center of the image. However, this could also be as a result of the sensor being not very good at getting a good reading of water bodies.
Conclusion
The value of this lab was rooted in the experience of being able to observe a full flight mission on beautiful spring day. I learned the amount of caution one must approach all UAV flights with. If always cautious and diligent with your premade checklist, you will hopefully be able to detect any malfunctions before they become mid-flight catastrophes. Not only that, it was also help full to see the order of operations in terms of creating a mission plan, exporting the mission to the Matrix platform, and executing the mission.
In terms of the data, I am not sold on the data quality of the imagery obtained from the thermal sensor. It was to difficult to see any true heat coming from the human locations on the map. That was a concern. Again, I am not sure if this can be improved upon by better mission planning, where if we know the subjects that we are looking for, we adjust the mission accordingly. For example, I believe these results could have been made better had the mission been conducted obliques.
No comments:
Post a Comment